The calves are a muscle group that give lots of guys headaches. Many regard the muscles as “stubborn,” or painfully slow to grow—which leads some people to just disregard training plans that target the calves because they simply blame genetics for lack of size or because they assume other lower body movements give the muscles enough attention.
But there are some common exercises for calves, most notably the traditional calf raise. This is a great exercise, don’t get me wrong—but if we leave our training to just one way of thinking in respect to how we’re targeting the calves and producing calf muscular hypertrophy adaptations, then we could be leaving gains on the table.

Let’s look into the calf raise exercise and how to do it properly, along with other calf training tips and a plan for you to attack your lower body workouts with more intent.
How to Do Calf Raises
Actually doing the calf raise is simple, but there are a few performance points to keep in mind for the most effective possible training. While there are multiple variations and implements you can use, we’re going to focus on the standard standing loaded calf raise.
Step 1: Nail the Setup
Whether you’re performing these on a Smith machine, a dedicated calf raise machine, or simply on a ledge, it’s important to acknowledge your foot positioning and where the weight is sitting. Ideally, you’ll want the balls of the feet serving as the main points of contact on whatever implement you’re choosing to use, and you’ll want the weight over the mid-foot.
I prefer keeping the weight over the mid-foot, so we can load the calves as much as possible when in a fully dorsiflexed position (bottom of the eccentric, toes up).
Step 2: Leg Position and Calf Engagement
With the legs, keep a nearly locked out position with a tiny bend in the knees. The quads should be engaged in keeping your leg positioning throughout the set and assisting with lower body stability.
Maintaining contact with the balls of the feet on the implement, drive down, and think about displacing your weight across all of the bases of the toes and pushing the earth away.
Step 3: The Concentric and Eccentric Contractions
At the top of the rep, squeeze the calves as hard as possible and focus on maintaining your weight displacement across all of the bases of the toes. Then, as you lower yourself down, think about controlling the weight and staying controlled in the bases of your toes.
Once you hit full depth (the end of your range of motion), keep fighting to maintain calf tension and resist letting the ankles relax into dorsiflexion.
Calf Muscle Function and Structure
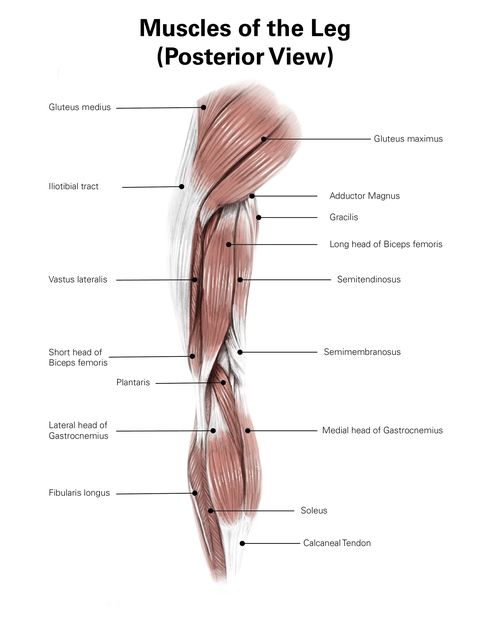
To better train the calves, it’s a good idea to understand what the muscles of the lower leg do. There are two primary calf muscles: the soleus and gastrocnemius. The soleus is a deeper muscle that plays a role in ankle stability and plantar flexion. The gastrocnemius is the more superficial two-headed muscle that most focus on when training the calves. This muscle plays a role in plantarflexion and assists with some level of knee flexion.
The soleus is often primarily composed of slow-twitch muscle fibers, while the gastrocnemius is composed of a mix of slow and fast-twitch fibers. If we can understand the muscle fiber composition and relate that to their function, then we can better structure our calf training.
When the knee moves through various degrees of flexion, the soleus and gastrocnemius will be active to certain degrees. For example, when the knee is flexed to 90 degrees or great, the soleus will be the primary muscle active for creating plantarflexion. This is important to remember for anyone that uses seated calf raises to target the gastrocnemius.
Calf Training Workout Structure and Tips
I’ve never understood the people who claim that they “get enough calf work through my other training”—especially when the goal is muscular hypertrophy. In order to spur growth, some isolation training will be needed to really have an effect.
Let’s look at it this way. The calves are always working to some degree throughout the day when we’re moving our lower body. The soleus is a postural muscle which means it’s used to handling high volumes of activity and resisting gravity day-in and day-out, and the gastrocnemius is used any time we create plantarflexion force. If that’s the case, why wouldn’t we make an active decision to give the soleus and gastrocnemius even more attention if we want them to grow?
Think about it in relation to other muscle groups. If you were to say “I want bigger delts, but I get enough shoulder work with my overhead press,” you’d probably get laughed out of the gym. Once you’ve passed a beginner training phase, if you want bigger delts, you’re going to have to work them in isolation to some degree.
So, if we take all of the above into account, how should we structure calf training for muscular hypertrophy gains? One approach is to add three days of additional calf work to ensure we’re hitting enough volume to actually create some level of hypertrophy-focused change.
An example of what training calves with three day a week frequency could look like the following:
Day 1
Take these sets to 1 to 2 RIR (reps in reserve, so not to failure)
Day 2
Take these sets to 0 to 1 RIR
Day 3
Take these sets to 1 to 2 RIR and add an 8-second pause in a fully stretched dorsiflexed position where you’re actively eccentrically contracting.
More Calf Muscle Training Tips
A few tips that can be useful to keep in mind when tackling calf training with strategy include:
Remember, it’s the deeper lower leg muscle and if we want to grow the calves as a whole, then it’s a good idea to give some attention to the soleus. Seated calf variations are great options for hitting the soleus.
Take calf-focused sets somewhat close to failure and don’t be afraid to add tempo work and pauses to increase effort.
Your calf training could impact how well you perform on the rest of your lower body training days. As a rule of thumb, avoid additional calf work the day before heavier leg training or any other athletic-focused day where you’re wanting to spend more thoughtfully on. Basically, don’t prioritize second-tier work over first-tier work.
Source: Read Full Article


